
Pterosaur RC VTOL User Manual
NOTICE
- CHOKING HAZARD - Small parts. Keep away from children under 3. For ages 14 and up. Operate with adult supervision.
- The remote requires 4 AA batteries. Remove the screw from the rear panel of the remote to install new batteries. Replace panel.
- Protect your eyes, spinning propellers can cause injury and property damage. Fly in outdoor area away from people or property.
- Check with your local regulations and know your airspace before flying in any area.
- Periodically revisit this manual to keep updated about changes to product specifications. Product specifications may be altered at any time without notice.
BINDING THE REMOTE CONTROLLER TO THE AIRCRAFT
- Connect the battery to the aircraft and place it on the ground in an outdoor, open area to fly.
- Lower left remote stick to the lowest position. Turn remote power button ON.
- Push the left remote stick completely forward, then pull the left remote stick completely backward.
- The red indicator lights of the remote and the aircraft will stop flashing. Binding is now successful.
- If binding is not successful, disconnect the aircraft power and turn off the remote, then repeat the binding steps above.
- Connect battery to aircraft correctly. Make sure red wires connect only to red wires and black wires connect only to black wires.
OPERATING AIRCRAFT
- Power on the aircraft. Power on the remote. Complete the binding process. Use this product outdoors.
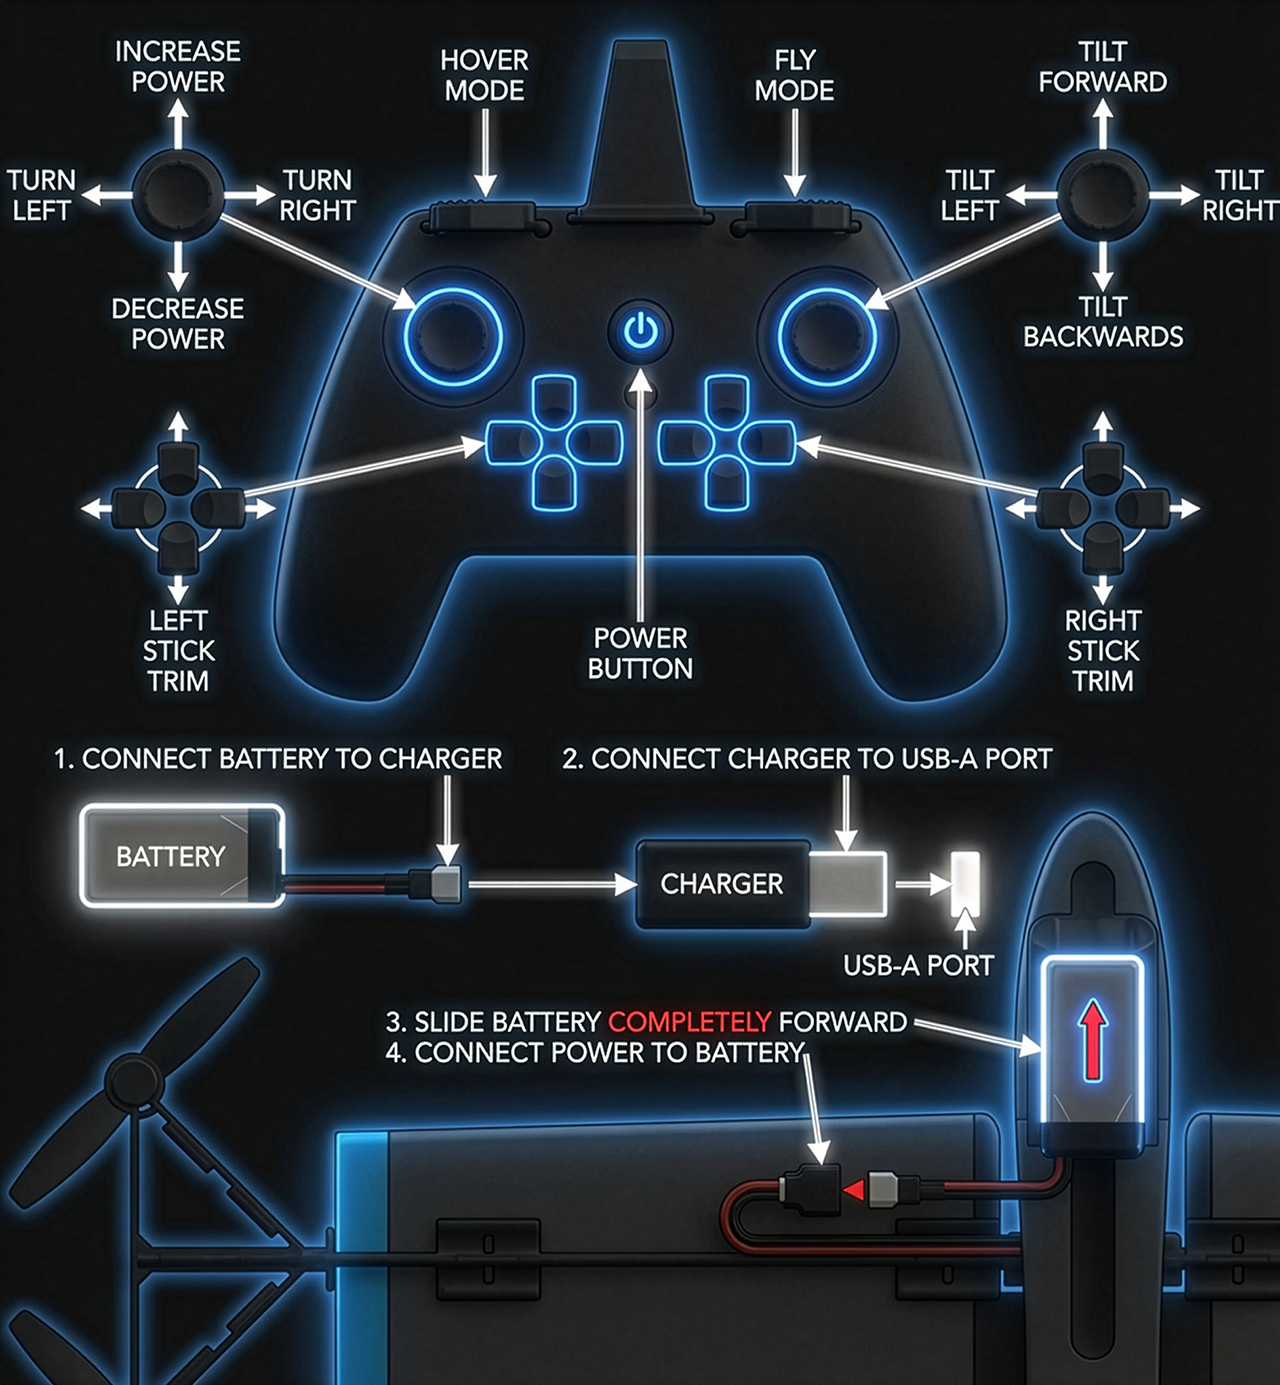
- Move the left stick forward to increase power to the motors. Move the left stick backward to decrease power to the motors.
- Move the left stick to the left to turn left. Move the left stick to the right to turn right.
- Move the right stick forward to tilt the aircraft forward. Move the right stick backward to tilt the aircraft backward.
- Move the right stick to the left to tilt the aircraft to the left. Move the right stick to the right to tilt the aircraft to the right.
- Press the “HOVER” button to hover like a helicopter. Press the “FLY” button to fly like an airplane.
LEFT AND RIGHT STICK TRIM BUTTONS
- Use the left and right stick trim buttons to make adjustments to the control sticks and improve aircraft stability.
- EXAMPLE PROBLEM: The aircraft tilts to the left while flying in HOVER mode.
- EXAMPLE SOLUTION: Tap on the right button for RIGHT STICK TRIM. Each tap will reduce the amount of tilting to the left.
- Perform an aircraft calibration if the aircraft is unable to achieve good stability after adjusting the stick trim buttons.
CHARGING THE BATTERY
- Plug charger into a USB port. The red light will turn on. The light turns off during charging, then on once charging is complete.
- Charging time is approximately 100 minutes. Do not continue charging once battery is fully charged.
- Connect battery to charger correctly. Do not connect the battery to the charger in a reversed position.
- Do not leave the battery unattended while charging. If battery becomes hot to the touch, stop charging immediately.
- Do not use chargers from other products to charge the battery.
- After use, wait about 30 minutes for the battery to cool down before charging again.
- Do not expose the battery to fire, expose the battery to heat sources or pierce the battery to avoid risk of fire or explosion.
- Do not short-circuit the battery terminals. Do not place battery together with metal objects to avoid risk of short-circuiting.
- When the aircraft is not in use, disconnect battery plug from aircraft power connector to prevent battery damage.
AIRCRAFT CALIBRATION (optional) - Aircraft is factory calibrated. Calibrate only if aircraft has trouble staying level.
- Connect the battery to the aircraft and place it on a level surface. The aircraft indicator light will flash slowly.
- Turn on the remote and complete the binding process. The aircraft indicator light will remain steadily on.
- Level the black box in the center of the wing by placing all 4 motors horizontally level with each other (hover mode orientation).
- Pull the left remote stick to the backward, left corner and pull the right remote stick to the backward, right corner for 2 seconds.
- Indicator lights on remote and aircraft will go from solid to flashing, then back to solid indicating that calibration was successful.
FCC Compliance Statement
Pursuant to the National Security Determination transmitted to the Federal Communications Commission (FCC) on December 21, 2025, this device meets all applicable criterion as a Toy Drone.
This device complies with part 15 of the FCC Rules. Operation is subject to the following two conditions:
(1) this device may not cause harmful interference, and (2) this device must accept any interference received, including interference that may cause undesired operation.
CAUTION: The grantee is not responsible for any changes or modifications not expressly approved by the party responsible for compliance.
Such modifications could void the user’s authority to operate the equipment.
NOTE: This equipment has been tested and found to comply with the limits for a Class B digital device,
pursuant to part 15 of the FCC Rules. These limits are designed to provide reasonable protection against harmful interference in a residential installation.
This equipment generates, uses, and can radiate radio frequency energy, and if not installed and used in accordance with the instructions, may cause harmful interference to radio communications.
However, there is no guarantee that interference will not occur in a particular installation. If this equipment does cause harmful interference to radio or television reception,
which can be determined by turning the equipment off and on, the user is encouraged to try to correct the interference by one or more of the following measures:
- Reorient or relocate the receiving antenna.
- Increase the separation between the equipment and receiver.
- Connect the equipment into an outlet on a circuit different from that to which the receiver is connected.
- Consult the dealer or an experienced radio/TV technician for help.
Aircraft FCC ID
2BV6L-PTEROSAUR
Controller FCC ID
2BV6L-PTEROSAURTX
SKU
PTERO-SAUR-V1-GRAY
GTIN
884400998965
National Security Determination on the Threat Posed by Toy Drones Produced in Foreign Countries
Pterosaur RC VTOL is classified as a toy and meets all applicable criteria outlined in the National Security Determination for Toy Drones:
- The aircraft weighs less than 150 grams.
- The operation is limited to line-of-sight operations less than 100 meters.
- The maximum sustained altitude is less than 300 feet.
- No GPS/GNSS or equivalent system.
- No connectivity or network capability; it only includes a dedicated radio frequency link between the controller and the aircraft. The frequency range is 2440-2475MHz.
- No imaging or sensing capabilities.
- Flight time is less than 10 minutes.
- Maximum horizontal speed is less than 10 meters/second.
- It is explicitly marketed as a toy for recreational use.
- No modular payload interface, such as airdrop and release mechanisms, searchlights and strobes, and micro-FPV cameras and protection cages.
- It doesn't contain brushless motors.
- It is not produced by an entity identified in Section 1709 of the Fiscal Year 2025 National Defense Authorization Act.